


There is a specific, quiet frustration that comes from pulling a half-opened bag of brown sugar out of your cabinet, only to find it rock-hard, leaking granules across the shelf, and wedged behind three duplicate boxes of baking soda you forgot you bought.
Most social media pantry makeovers are staged inside sprawling walk-in rooms larger than a standard apartment’s entire kitchen. If you live in an apartment, rent an older home, or share a narrow reach-in cabinet with your cleaning supplies, buying random bulk jars will leave you with less usable space than when you started. Choosing the right pantry storage containers for an organized kitchen is not about chasing sterile visual perfection; it is about moisture control, food preservation, and claiming back every single square inch of shelf depth.
Why Pantry Storage Containers For An Organized Kitchen Matter in Small Spaces
Decanting dry ingredients into dedicated vessels serves three distinct purposes: shelf space efficiency, pest prevention, and visual inventory management.
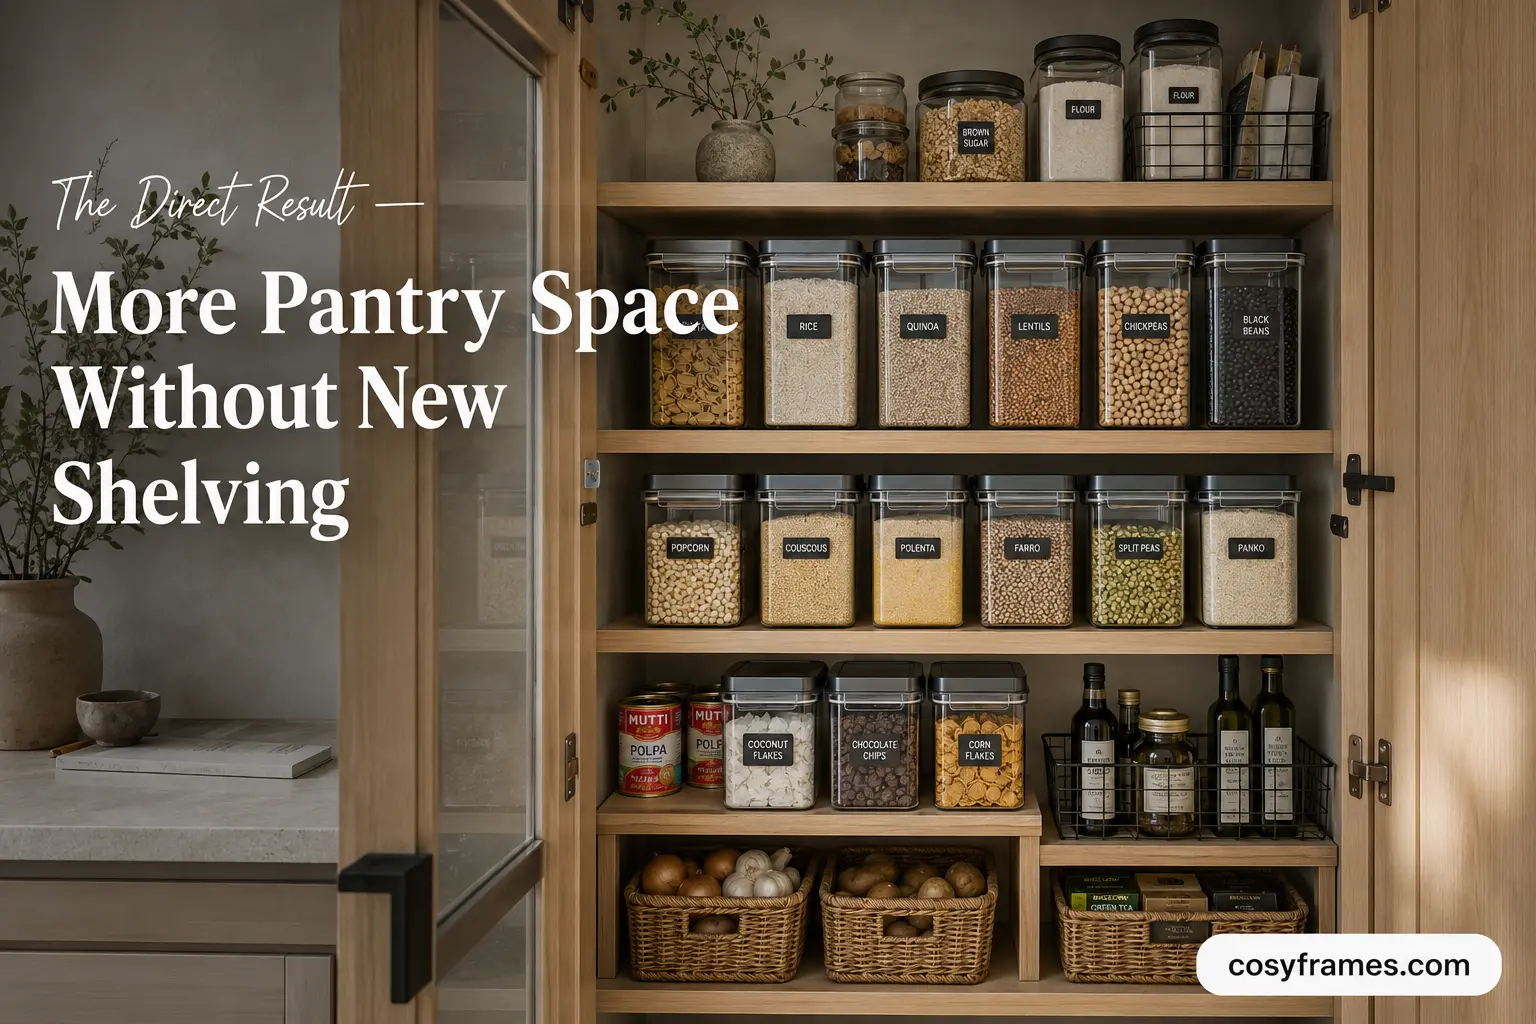
When you leave staple ingredients inside irregular paper sacks and plastic pouches, they slouch, tip over, and hide items stacked behind them. Investing in modular pantry storage containers for an organized kitchen creates vertical stability. Square corners sit flush against cabinet walls, eliminating the “dead air” that round packaging naturally creates.
Furthermore, pests like weevils and pantry moths easily chew through cardboard boxes and thin baggies. Locking bulk ingredients inside airtight pantry storage containers for an organized kitchen prevents cross-contamination and saves you dozens of dollars in wasted groceries each year.
Glass vs. Plastic Pantry Storage Containers For An Organized Kitchen
Every material brings distinct trade-offs in weight, durability, shelf wear, and cost.
| Container Material | Best Suited For | Key Advantages | Potential Drawbacks |
| BPA-Free Acrylic / PET Plastic | Deep cabinets, high shelves, rental units | Ultra-lightweight, shatterproof, tight vertical stacking | Can scratch; requires gentle hand-washing |
| Borosilicate Glass | Open shelves, counter displays, standard dry goods | Non-porous, stain-proof, dishwasher-safe, classic look | Heavy; high breakage risk when stored up high |
| Glazed Ceramic & Stoneware | Coffee beans, tea, garlic, onions | Completely blocks ambient light, high decor value | Opaque (cannot check levels); heavy |
Lightweight BPA-Free Plastic Canisters
If your kitchen features lightweight melamine or wire shelving typical of rentals, weight is your main constraint. A full set of filled glass jars can easily bow an unsupported shelf. Clear, BPA-free modular plastic units especially rectangular shapes with lever-locking lids maximize flat surface area without placing heavy loads on your cabinetry hardware.
Borosilicate Glass Jars with Airtight Seals
Borosilicate glass is thinner, stronger, and more thermal-shock-resistant than standard soda-lime canning glass. For open shelving displays, clear glass provides timeless charm. However, remember that round glass jars sacrifice up to 25% of your shelf footprint due to circular gaps. Always look for square-profile glass jars whenever possible.
The Complete Sizing Guide for Dry Food Canisters
Avoid the mistake of buying multi-packs online without matching the container volume to standard supermarket grocery packaging:
- 0.5 Liter (approx. 16 oz): Ideal for pine nuts, chia seeds, cornstarch, baking powder, and dried fruit.
- 1.0 to 1.5 Liters (approx. 34–50 oz): Holds standard 1-pound bags of dried beans, brown rice, lentils, quinoa, and short pasta shapes like penne or fusilli.
- 2.0 to 2.5 Liters (approx. 70–85 oz): Fits a standard 1-pound box of spaghetti (requires a canister at least 11.5 inches tall), rolled oats, and medium family-size cereal boxes.
- 3.8 to 4.0 Liters (approx. 130–135 oz): Necessary for a full 5-pound bag of all-purpose flour or granulated sugar. If you buy a canister under 3.8 liters for flour, you will end up storing half an open bag on the shelf anyway.
4 Smart Ways to Style Pantry Storage Containers For An Organized Kitchen
1. The Deep Cabinet “Pull-Out Drawer” Trick
Deep, dark kitchen cabinets routinely hide forgotten cans and boxes. Rather than stacking small containers two or three rows deep, pair your modular canisters with deep clear acrylic pull-out bins. These act as faux pull-out drawers, allowing you to slide the entire bin forward to reach items stored in the back without knocking over front rows.
2. Vertical Stacking on Tall Shelves
When fixed shelves leave large vertical gaps, you lose valuable storage capacity. Choose modular pantry storage containers for an organized kitchen that have recessed lid rims engineered specifically for secure stacking. Keep heavy, high-volume staples like flour and rice on the bottom, with lighter dry goods like breadcrumbs and rolled oats stacked directly above.
3. Over-the-Door Spice and Packet Racks
When primary cabinet space is at capacity, an over-the-door hanging wire rack creates instant real estate. Line these shallow tiers with slim rectangular containers (under 4 inches deep) for taco seasonings, bouillon cubes, and dried baking ingredients.
4. Unified Open-Shelving Displays
If your kitchen features open shelving, keeping visual clutter to a minimum is vital:
- Stick to one lid material throughout (such as uniform natural acacia wood or matte white).
- Leave two inches of negative space between clusters of canisters to prevent a crowded appearance.
- Let the natural textures and colors of grains, lentils, and pastas provide decorative warmth.
How to Label Your Canisters Without Leaving Sticky Residue
Permanent labels create unnecessary friction when your meal habits change. You might dedicate a canister to “Rigatoni,” only to buy jasmine rice three weeks later.
- Waterproof Removable Vinyl Labels: Use matte-finish repositionable stickers that peel off clean under warm running water without leaving gummy adhesive behind.
- Oil-Based White Chalk Markers: Write directly on clear glass or smooth plastic. The ink will not smudge from dry hands, but rinses clean with warm soapy water and a sponge when you need to swap ingredients.
- The Underside Expiration Date Hack: Cut out the cooking instructions and expiration date from original cardboard packaging. Tape it flat to the underside of the canister lid with blue painter’s tape. This keeps the front clean and uncluttered while ensuring cooking times remain handy.
5 Common Mistakes When Buying Pantry Storage Containers For An Organized Kitchen
- Purchasing Sets Before Measuring Dimensions: Always record shelf depth, usable height, and door hinge clearances before ordering canisters online. Remember to leave an extra half-inch above the containers so your fingers can lift them out easily.
- Selecting Round Vessels for Narrow Cabinets: Round jars leave empty gaps between contact points, wasting valuable shelf space. Reserve round jars for open displays and use square units inside closed cupboards.
- Choosing Narrow Openings: Always check that the mouth of flour and sugar containers is wide enough to fit a standard 1-cup dry measuring scoop flat. Narrow openings force you to pour ingredients, which inevitably leads to spills.
- Decanting Infrequently Used Ingredients: Decanting makes sense only for weekly staples. Niche items like specialty almond flours or tapioca starch stay fresher when stored in the refrigerator in their original resealable bags.
- Overbuying Budget Multi-Packs: Cheap, thin plastic lids crack along the hinges within months. Choose durable silicone gaskets and thick latching handles that maintain a true airtight seal over years of daily use.
Maintaining Your Organized Pantry All Year Long
Even the most thoughtfully arranged pantry storage containers for an organized kitchen require a simple upkeep habit to prevent clutter from returning.
Adopt the “overflow bin” method: when a newly purchased bag of rice does not completely fit into its canister, do not leave the half-empty bag sitting loose on the shelf. Place all overflow bags inside a single dedicated basket on your highest shelf. Refill your main canisters from this overflow bin before adding new items to your shopping list.
Take five seconds to perform a quick visual inventory scan of your clear pantry storage containers for an organized kitchen every week before heading to the market. Clear walls show your remaining stock instantly, saving you from purchasing unnecessary duplicates and keeping your shelves tidy.
FAQ
What are the best pantry storage containers for keeping bugs and pantry moths out?
Airtight canisters fitted with silicone gaskets and heavy-duty locking latches provide the strongest defense against pests. Solid glass and thick BPA-free plastics prevent insects from chewing through, unlike thin paper bags and cardboard boxes.
Are square or round containers better for small rental kitchens?
Square and rectangular containers are far better for compact kitchens. They align flush against walls and each other, maximizing shelf depth and eliminating the wasted gaps that round jars create.
How should I wash airtight containers before refilling them?
Wash plastic canisters with lukewarm water and mild dish soap to prevent surface clouding. Ensure that all containers and silicone gaskets are left to air-dry for at least 12 hours before refilling; even slight trapped moisture can spoil dry staples.
What should I do with food that does not fit in the decanted container?
Keep an open “Refill Basket” on your top shelf or cabinet floor. Store all partially filled original bags upright in that single bin so your main shelves stay neat and uncluttered.
Is glass or plastic better for dry kitchen storage?
Glass is optimal for open displays, odor resistance, and long-term durability. Lightweight BPA-free plastic is the better option for high shelves, rental units with weak shelf supports, and homes where heavy glass could be dropped.